NAIL IMAGERY
An interactive color testing application
Monica Nguyen
This application is designed for users to test sample colors on their nails without having to paint the actual color on.

When people want to get manicures they go to nail salons. These are important places to keep up with self-care for hands and toes. For most, one of the important products to get in the end is color; paint for the nails.
Sometimes, usually majority, choosing a nail color is often the task of the customer that takes the longest time to complete. Usually the commitment of keeping on a chosen color before their next visit is around 2 - 3 weeks. Depending on the person the color can be easy to find but to others, it can be daunting. There are some clients who cannot imagine what a color looks like on their nails without actually painting it on. Even if they place a swatch on top of their nail they justify the need for swatches on their whole hand (five fingers).
Which is why the Nail Imagery application would be the perfect solution for this task. Not only does it provide a way to test colors on a client's nails, switching through swatches is much more quick, efficient, and effective.
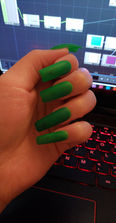
In order to use this application, the user will put on the provided fake green tips. Under each tip there is a piece of kneaded eraser to attach the tip to the natural nail. The user will then position themselves in front of the camera, making sure the camera can see the green nail tips. The user will swipe their hand over the leap motion controller that is set-up in front of the laptop device to switch between the colors already in the palette of the application. As the user swipes their hand over the controller they will see their tips change nail color in front of the camera.
In a broader scale, besides the fact that this application would be a great tool for testing nail colors; this notion can be applied to many other product color testing.
The process of this project started with buying the correct green polish color for keying (similar to the use of a green screen) with the program of choice (TouchDesigner). A matte top coat was also necessary to place on top of the tips to make sure the color was not shiny, that way the color can be keyed better.
Then I set up the Leap Motion controller by connecting it to my laptop device, right-clicked the controller icon to select and open the visualizer. I checked the visualizer by arranging my hands over the controller to make sure the Leap Motion was reading them; it works when a skeleton aligns with the motion of my hands.
Setting up the program in TouchDesigner involved three parts: the chroma key to read the green nails, the palette of colors that will be swiped to switch colors by the user with the Leap Motion controller, and the Leap Motion controller to swipe between colors.
The chroma key set up starts with the operator TOP Video Device In to utilize the video camera in my laptop. Within the same operators TOP the following are connected: Video Device In > Chroma Key > Threshold > Blur > Matte. TOP Chroma Key is used to find the green color seen by the camera, threshold is used to fix the quality of the green key, TOP Blur is used to adjust the outer edges and softness of the green key, and TOP Matte composes the operators together based on the order of the inputs. Create a TOP HSV Adjust to connect to the TOP Video Device In if you need to adjust the color of the camera. TOP Video Device In connects to TOP Matte in the first input. TOP Blur connects to TOP Matte in the third input.
Creating the palette of colors are composed of TOP operators: Switch > Constant. I created ten constant operators since I have ten colors (I changed the color of the constants). All TOP Constant is connected to Switch’s input. TOP Switch is connected to TOP Matte in the second input.
Setting up the Leap Motion controller uses the CHOP operators: Leap Motion > Select > Logic > Count. I know Leap Motion is working in TouchDesigner when I see the channels data animating in the operator while swiping my hand over the controller. I chose the hand/palm channel to use as my trigger with the Leap Motion controller because it reacted the most to my swipe. I input this channel into my CHOP Select operator. The CHOP Logic sets the bounds for when the trigger will occur by the CHOP Select channel. The CHOP Count is maxed to 10 because I chose 10 colors and the CHOP Count is connected to the TOP Switch operator by ‘Relative Chop Reference.’ This is done by tapping the bottom right diamond of the CHOP Count operator and left-clicking to drag the CHOP Count into the Index option of the TOP Switch.
Operators and settings:

Chroma Key parameters:


Palette of Colors parameters:


Leap Motion Controller parameters:


The process is still in continuation but was a fun project to get started. Next will be designing the interface and testing the application in an actual salon setting.


